Connect your AI assistant to Chat Thing
Connect your AI assistant to Chat Thing once, and it can build and manage your bots whenever you ask.
What you need
A Chat Thing account (sign up free) and an AI assistant that can add a remote MCP server over HTTP (sometimes called "Streamable HTTP" or a "custom connector"). Every client below does.
Who can do this: anyone with a Chat Thing account. Your assistant can only change bots in teams where you're an owner or admin.
The Chat Thing MCP address
Every assistant connects to the same address:
https://app.chatthing.ai/mcp
You don't paste a password or key. The first time your assistant connects, it opens a Chat Thing page in your browser. Sign in if asked, check the request and click Approve. See Authentication for what you're approving.
You can also find this address, and a ready-made setup prompt, on the Connect agent page in the Chat Thing app.
Let your assistant set itself up
On the Connect agent page, click Copy setup prompt and paste it into your assistant. It reads this page and follows the steps for the client it's running in. If you're an AI agent reading this page: work out which client you are running in, follow that section below, then ask the user to approve access in their browser.
Desktop and web apps
These apps don't use a config file. You add Chat Thing from a settings screen and approve access in the same window.
Claude Desktop and Claude.ai
The Claude desktop app and Claude.ai use the same connectors screen. This is the Claude app, not the Claude Code command-line tool, and you can use either or both.
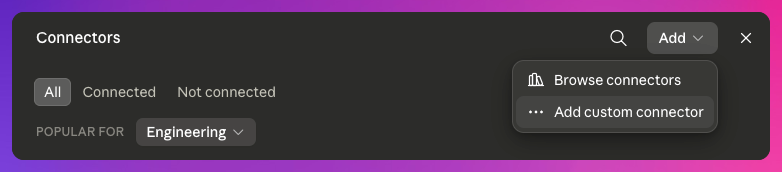
- Open Settings → Connectors.
- Click Add and choose Add custom connector.
- Enter the name
Chat Thingand the URLhttps://app.chatthing.ai/mcp, then click Add. Leave the advanced OAuth client ID and secret fields blank: Chat Thing registers Claude automatically.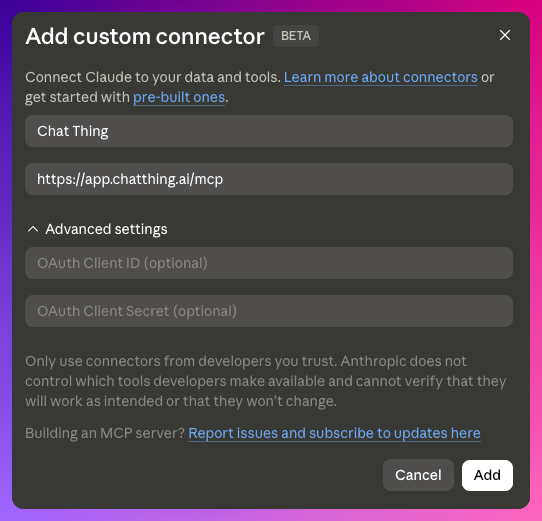
- Click Connect on the new connector and approve access on the Chat Thing page that opens.
Chat Thing now appears in your connectors list, and its tools are available in new chats.
ChatGPT
ChatGPT connects to MCP servers through its developer mode:
- Open Settings → Apps & Connectors → Advanced settings and turn on Developer mode.
- Back on Apps & Connectors, click Create to add a connector.
- Enter the name
Chat Thingand the URLhttps://app.chatthing.ai/mcp, choose OAuth for authentication, and create it. - Approve access on the Chat Thing page that opens.
ChatGPT is a separate product from Codex. For Codex, see Codex app or Codex CLI.
Codex app
The Codex desktop app stores MCP servers in the same ~/.codex/config.toml file as the Codex CLI.
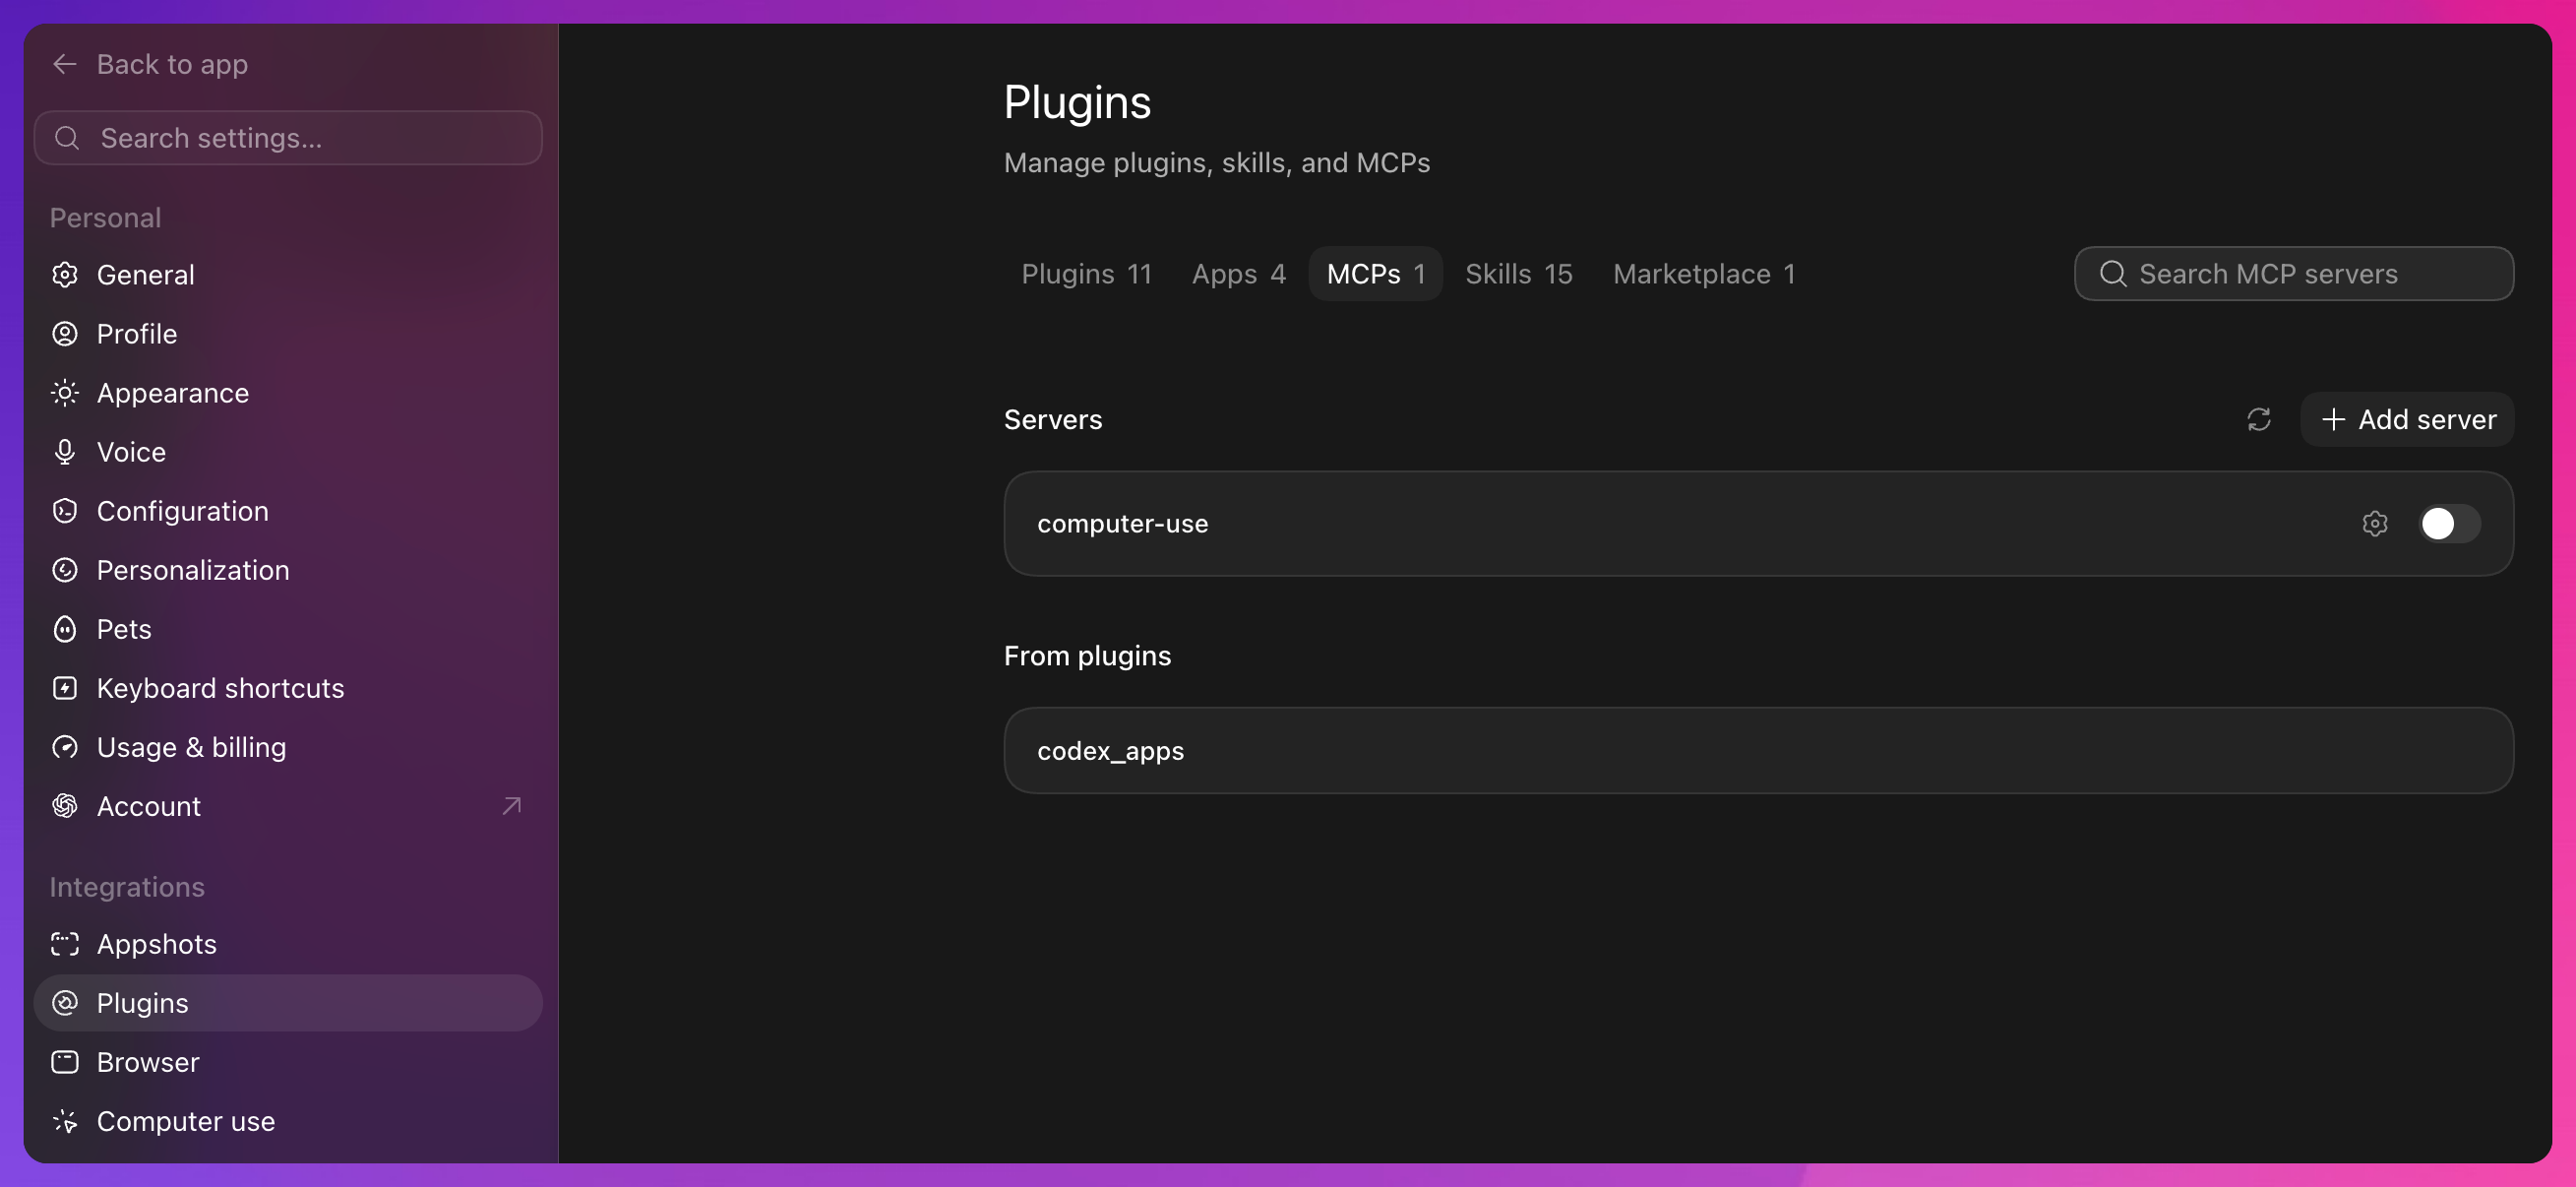
- Open Settings → Plugins, select the MCPs tab and click Add server.
- Enter the name
Chat Thing, set Type to Streamable HTTP and pastehttps://app.chatthing.ai/mcp. Leave the bearer token and header fields empty to connect with your browser (only fill in a bearer token if you're using an API key). Click Save.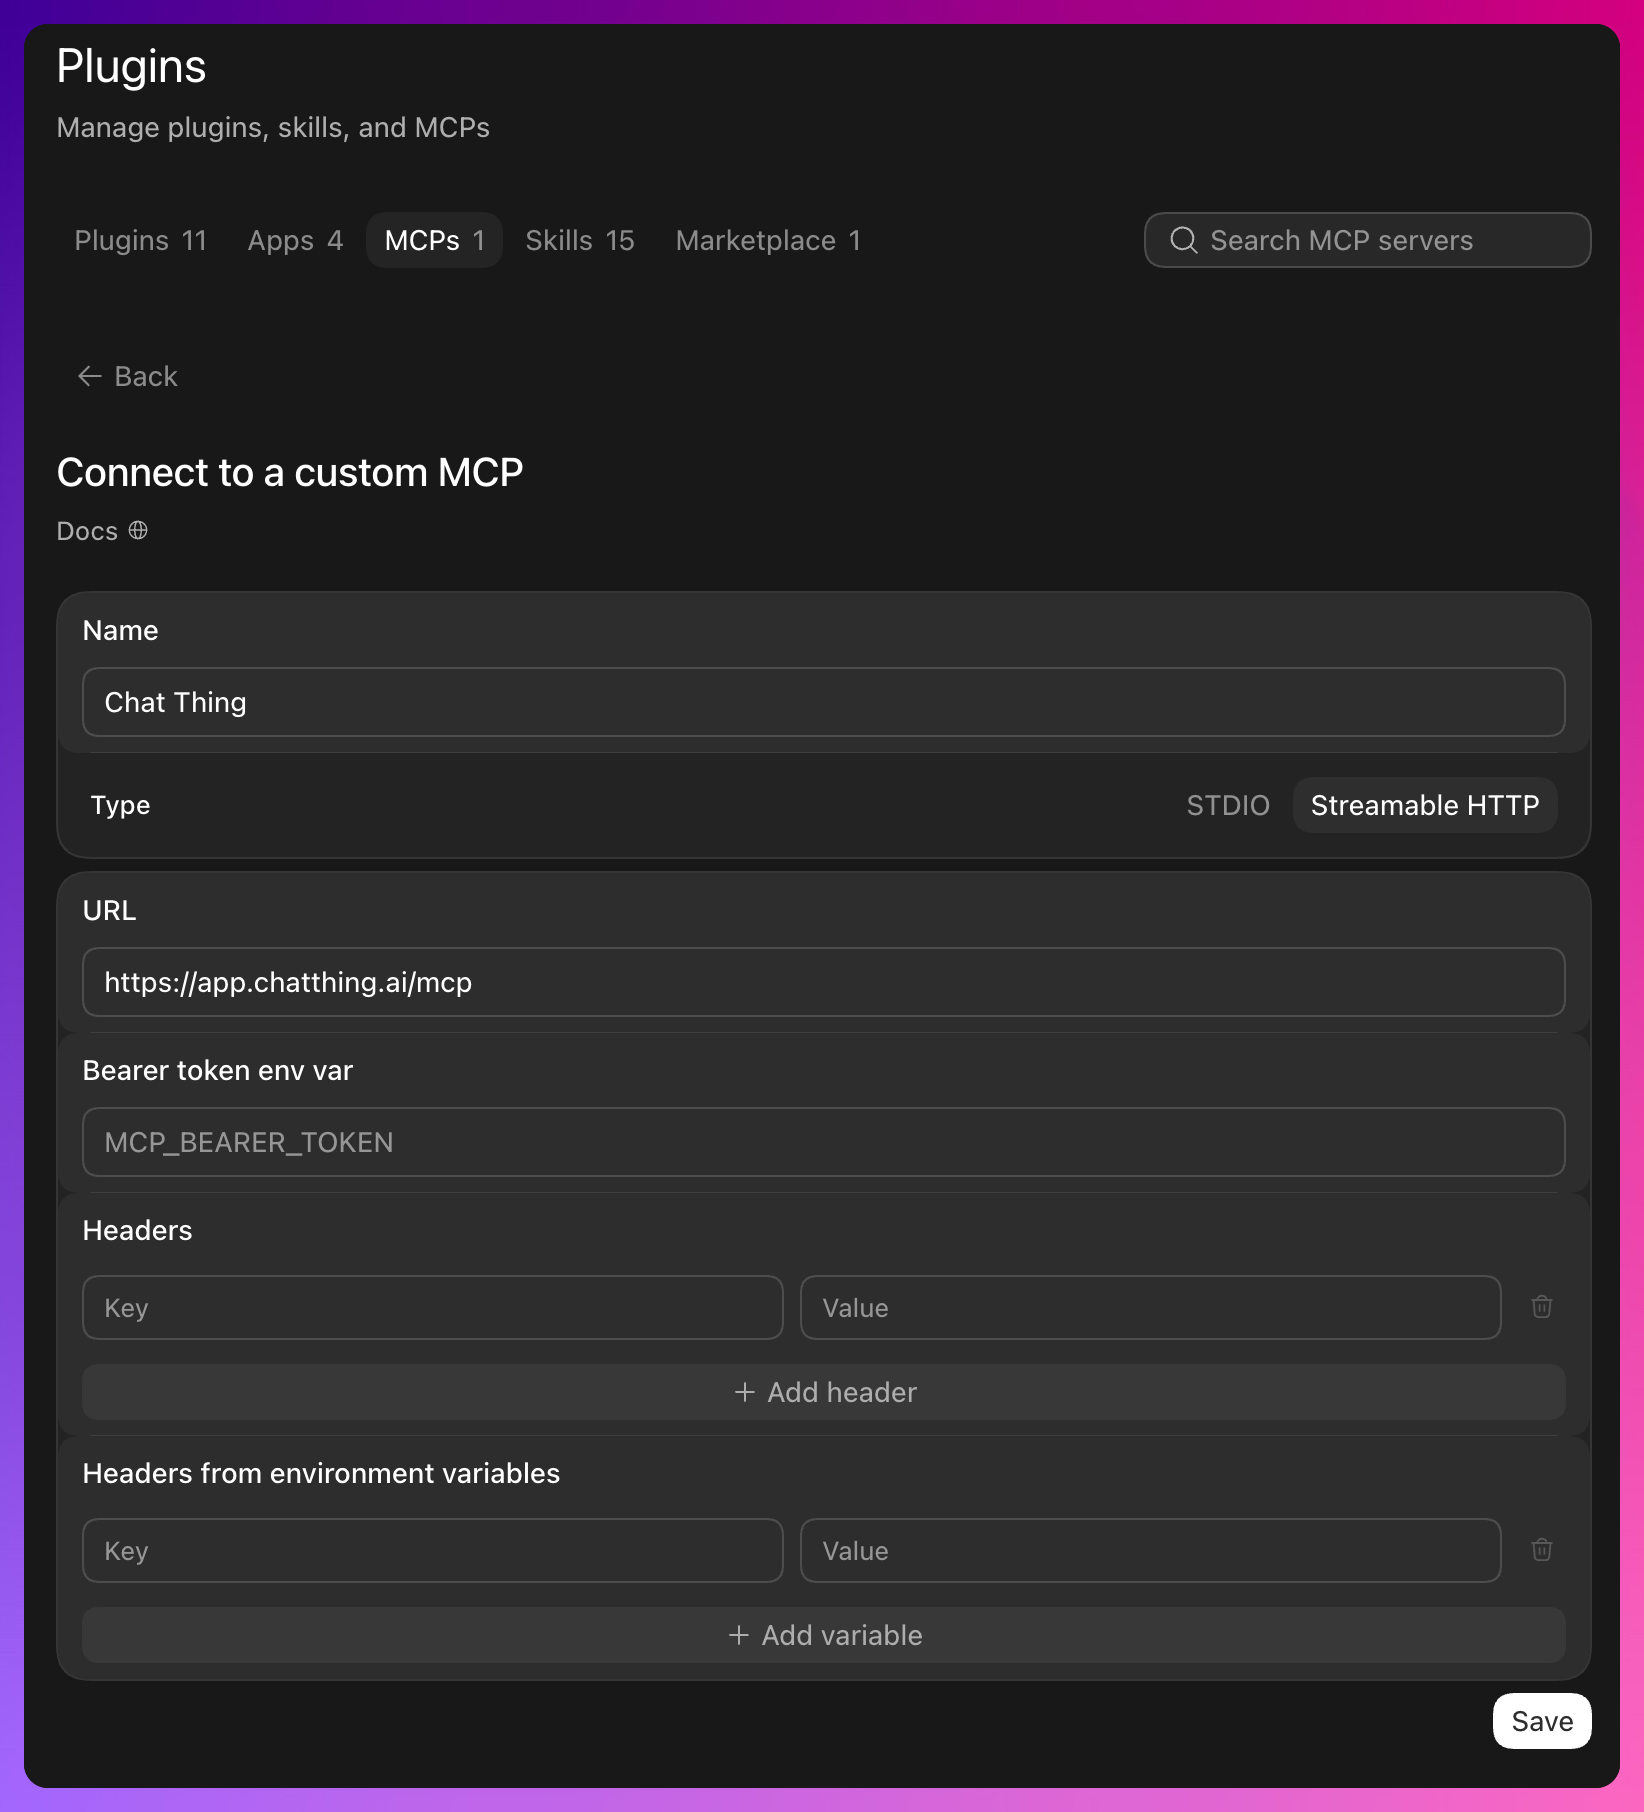
- Restart the server if Codex asks you to, then approve access on the Chat Thing page that opens.
Coding assistants and editors
These clients connect by running one command or adding a few lines to a config file. The first time the assistant uses Chat Thing, it opens your browser so you can approve access.
Claude Code
Run this in your terminal:
claude mcp add chatthing --transport http https://app.chatthing.ai/mcp
Codex CLI
Add the server to ~/.codex/config.toml:
[mcp_servers.chatthing]
url = "https://app.chatthing.ai/mcp"
Cursor
Add the server to ~/.cursor/mcp.json:
{
  "mcpServers": {
    "chatthing": {
      "url": "https://app.chatthing.ai/mcp"
    }
  }
}
Windsurf
Add the server to ~/.codeium/windsurf/mcp_config.json:
{
  "mcpServers": {
    "chatthing": {
      "serverUrl": "https://app.chatthing.ai/mcp"
    }
  }
}
VS Code
Add the server to .vscode/mcp.json in your workspace:
{
  "servers": {
    "chatthing": {
      "type": "http",
      "url": "https://app.chatthing.ai/mcp"
    }
  }
}
Zed
Add the server to your Zed settings.json (open it with zed: open settings file):
{
  "context_servers": {
    "chatthing": {
      "url": "https://app.chatthing.ai/mcp"
    }
  }
}
When no Authorization header is set, Zed asks you to sign in through your browser.
Cline
Add the server to Cline's MCP settings (cline_mcp_settings.json). Set type to streamableHttp so it uses the current transport:
{
  "mcpServers": {
    "chatthing": {
      "type": "streamableHttp",
      "url": "https://app.chatthing.ai/mcp"
    }
  }
}
Other assistants
Chat Thing follows the MCP standard, so any client that supports remote MCP servers over HTTP can connect. Use your client's usual way of adding an HTTP MCP server and point it at https://app.chatthing.ai/mcp.
Check it works
Ask your assistant:
List my Chat Thing bots.
It should reply with the bots in your account. Your assistant now appears under Connected agents on the Connect agent page in Chat Thing.
Next, try building a bot with your assistant, or see everything it can do.
Troubleshooting
My assistant can't open a browser
Scripts, CI jobs and some headless agents can't complete the browser approval. Use an API key instead.
The approval page says the request has expired
Approval links are single-use and time out. Go back to your assistant and start the connection again.
My assistant says it can't change a bot
Your assistant can read every team you belong to, but can only change bots in teams where you're an Owner or Admin. See What your assistant can access.
My assistant stopped working after I revoked it
Revoked assistants lose access within an hour. To use it again, reconnect by asking it to use Chat Thing and approving access again.
Related
- Control what your AI assistant can access
How AI assistants sign in to Chat Thing, what they can read and change, how to use an API key for scripts and CI, and how to revoke access.
- Build a bot with your AI assistant
Go from one prompt to a tested support bot using your AI assistant and the Chat Thing MCP server, and learn what a good build looks like.
- What your AI assistant can do in Chat Thing
Every tool the Chat Thing MCP server gives your AI assistant, from creating bots and adding knowledge to webhooks, tests and conversations.
Last updated